
Tutorial how to set up a aliexpress industrial modbus display.
Usually you can search for following listings: “0.56 in 4 Digit LED Display RS485 Serial Port Meter Communication RTU/ASCII Protocal”
So first the specs:
- Support ASCII text and RTU dual protocol automatic identification, no user setting in required.
- The meter can display 4 digit of serial port.
- Wide range of power supply voltage between DC7~36V.
- Large 0.56inch display area for only 4 digit ,more clear.
- The baud rate can be 1200bps/2400bps/4800bps/9600bps/19200bps/38400bps/57600bps/119200bps.
- Price 10-15 USD (12.2021)
Because display will come without any manuals or information, it was quite a hassle to find good information about the display.
Things we need:
1 ) RS485 TO USB converter

2 ) QModMaster Software https://sourceforge.net/projects/qmodmaster/files/
3) Termite Terminal https://www.compuphase.com/software_termite.htm
From behind without the cover the display looks like following:


Step 1:
Connect your RS485 converter with display. B- with B- and A+ with A+
Connect power for the display.
If RS485 converter is recognised by your computer, we can continue.
Step 2:
Lets open TermiteTerminal software:

Open settings and configure like following, remember to use right COM port:

Step 3:
Now we will ASCII mode to communicate with the display.
Try out following commands to make sure the connection between computer and display is established.
Serial response test:
$001,01&

Check digital mode:
$001,02&
If you receive following answers everything works as it should:
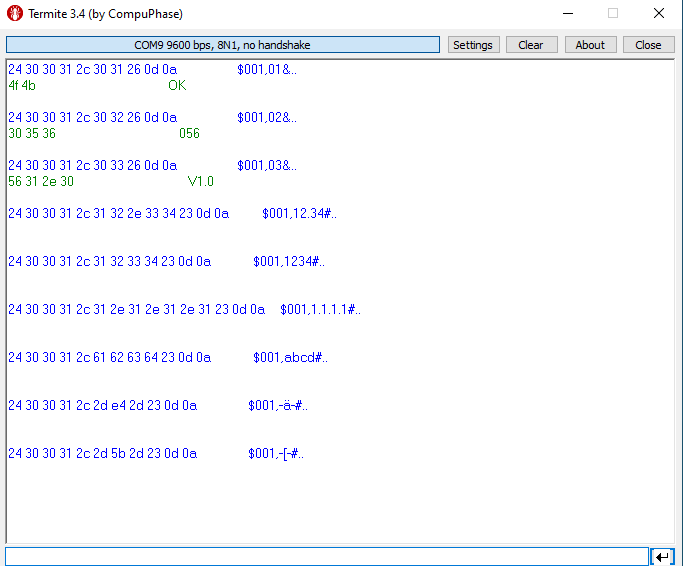
You can use ASCII to control the display:
Displays 12.14
$001,12.14&

Displays abc
$001,abc$

If everything worked we can proceed with the next step.
Close the Termite software.
Step 4:
Lets open QModMaster software:

Next lets configure QModMaster settings. Check on which COM port is used for the RS485 converter.
In QModMaster go “Options” -> “Modbus RTU”. Except for COM port your settings should be following:

Input Settings and click “OK”.
Step 5:
Now click on small connect icon:
![]()
Step 6:
Display modbus registers are following:
Decimal point:
Slave Addr: 1
Function: 0x06
Start Address: 4
Value:
Slave Addr: 1
Function: 0x06
Start Address: 0
So inserting 2 to the register 4 and 1001 to register 0 and writing the values will show 10.01:

Step 7:
You can also use multiple registers to indicate values on the display.
Value:
Slave Addr: 1
Function: 0x10
Start Address: Hex:0x90 / Dec:144
Number of Registers: 2
Values 2 and 1001 will display 10.01
Values 1 and 6006 will display 600.6

The first register is used for indicating decimal point and sign. Hex values for different options are as following:
Hex
00XX = +
01XX = –
XX00 = xxxx
XX01 = xxx.x
XX02 = xx.xx
XX03 = x.xxx
And that is it.
Additional information found on internet:


Thanks a lot for the information. Do you have any details regarding the baud rate setup and how to change from the default baudrate?
Behind the unit there is buttons that you can use. With these you can scroll trough settings like paritiy, baud rate, id etc. 9600 baud is displayed as 96 or 9600 I don’t remember exactly.